

A Trip to BLOOD ISLAND part 1 Beast of Blood Model kit
- Slasher Design Co.

- Aug 2, 2022
- 3 min read

Brief background
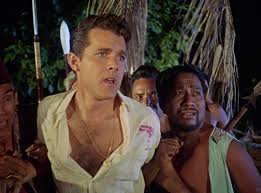
In case you aren't familiar with the films known as the Blood Island trilogy... we'll go through a brief summary. The trilogy (BRIDES OF BLOOD, MAD DOCTOR OF BLOOD ISLAND, and BEAST OF BLOOD) was a part of a series of horror films (Terror is a Man and Brain of Blood are also notable, the first being a b/w prequel so to speak and the later being somewhat of an adjacent cousin I suppose) shot in the Phillipines in the late 60s to the early 70's. The shocking drive-in hits were directed by Eddie Romero and Gerry de Leon and produced by Hemisphere Pictures own, Kane Lynn. Starring John Ashley (perhaps best known for his beach party movies of the 60s and also notably being the narrator on the A-Team for the first four seasons) the stories all took place on a fictional island aptly named, Blood Island. It is there that the madness and depravity, adventure and gore, and mutated monsters reside!
If you are a fan of drive-in/grindhouse style flicks and enjoy... as Joe Bob Briggs would put it... "Blood, Breasts, and Beasts"... then this series of films are a must see.


one sheet movie posters for BRIDES OF BLOOD (1968), MAD DOCTOR of BLOOD ISLAND (1969) and BEAST OF BLOOD (1970)
If you aren't sold on seeing these already... check out this video below!


BEAST OF BLOOD model kit process
I was fortunate enough to come across the seemingly rare Beast of Blood garage kit on eBay nearly a year ago. Immediately upon receiving it, I was impressed by the sculpt and sheer size/weight of this thing. Standing at nearly 18 inches, when assembled, Don Ramon Lopez (aka "chlorophyll monster/ or titular, "Beast") is an intimidating creature.


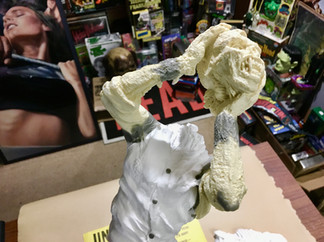


The first wall I ran into was that the arms and head/hands did not quite fit as they appeared they should. After some use of the Dremel and some strategic sanding, I got the them to all line up and fit in place. Even after all that I realized that the seams were going to be visable.
Out comes the Apoxie sculpt to mold and sculpt matching skin/shirt sleeves to hide the seams. I noticed that his shirt didn't have buttons... so to be as accurate as possible to the poster art, I added some shirt buttons.

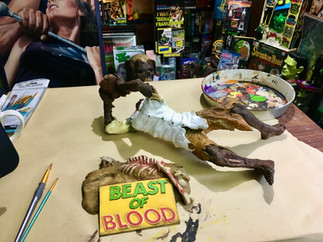


Painting was the next step. I started with the base/plaque, using acrylics and a variety of brushes. As you can see (above), originally I went with green on "Beast of" however eventually opted to repaint that to the matching red. My goal with the colors and look of the "beast" was to match it as close to the one sheet poster art as possible, while making a few artistic choices here and there. For instance I wanted him to have a bit more of a green tint than he did in Beast of Blood. I wanted him, color wise, to be more of a blend between the Mad Doctor version and Beast of Blood version.


After hours of painting, adding layer after layer of shading and highlights, I got to a point where I was happy with the outcome. Next, a few light washes here and there to enhance certain areas and one final brown/black wash to get in all those crevices to make it pop a bit, give it that dirty look and pull it all together.
Finally, what would probably be the most difficult task, attaching the rather heavy and awkwardly leaning "beast" to the base. Even though I had purchased some super heavy duty epoxy glue, and the package said its "like welding plastic", I wasn't confident that it would hold and be as sturdy as I preferred. After strategizing... I opted to drill a pilot hole up through the base and into the right heal/leg. The screw went straight up the leg and provides a very sturdy hold with the assistance of the epoxy. I then molded and painted some additional rocks/dirt around the feet for further support.
While I forgot to get process photos of the hair application... that was the actual "final" step. It was applied much like one would do when redoing the hair on a latex halloween mask. Start at the bottom, gluing several layers overlapping and working towards the top. Some watered down Elmers glue to style it a bit, a splatter or two of blood hear and there to blend to the scalp and wa-la! He's done.
Check back next time for A TRIP TO BLOOD ISLAND part 2, when we look at the rest of my ongoing BLOOD ISLAND collection.


360 view of final model


close ups/ detail photos of final model


Comments